|
|
Post by jmudrick on Mar 23, 2019 19:15:38 GMT -6
I think I'll need to order some 3D prints very soon:  The yellow colour is just for highlighting the pegs that hold the Proline blade  I need to decide on the material used to print these. Where you place the pegs is a big deal, as a small difference in exposure can make a huge difference. |
|
|
|
Post by 120inna55 on Mar 23, 2019 20:02:32 GMT -6
My "B-20s" arrived yesterday. Vendor made a mistake and sent P-20s, so I will have to wait a bit longer to use these. The green one came in today, so I cleaned them both up. Any idea how to get these yellow spots out? Heheh. Just kidding. I wasn't expecting the marbling. These really clean up nicely.
Blue and yellow make green. It may just be a part of the handle. Yeah, I was kidding. I'm fairly certain it was intentional. |
|
|
|
Post by 120inna55 on Mar 23, 2019 20:05:22 GMT -6
I think I'll need to order some 3D prints very soon: The yellow colour is just for highlighting the pegs that hold the Proline blade I need to decide on the material used to print these. Where you place the pegs is a big deal, as a small difference in exposure can make a huge difference. Exactly. He'll be making several versions for people wanting different exposures. Heheheh. I can see it now. It's awesome, though. I never thought about pegs. THIS is what makes this better than a shimmed blade. |
|
|
|
Post by jmudrick on Mar 23, 2019 20:21:16 GMT -6
Where you place the pegs is a big deal, as a small difference in exposure can make a huge difference. Exactly. He'll be making several versions for people wanting different exposures. Heheheh. I can see it now. It's awesome, though. I never thought about pegs. THIS is what makes this better than a shimmed blade. Agreed. Getting repeatable results is definitely one of the challenges in just using the shim. |
|
riverrun
Lather Catcher
 sɐǝɹpu∀
Posts: 888 
|
Post by riverrun on Mar 24, 2019 3:15:18 GMT -6
I think I'll need to order some 3D prints very soon: The yellow colour is just for highlighting the pegs that hold the Proline blade I need to decide on the material used to print these. Where you place the pegs is a big deal, as a small difference in exposure can make a huge difference. In the first version, the pegs will be placed such that the overall depth from back of adapter to edge of blade is exactly that of an Enders blade. Once I have one, I shave and reconsider. |
|
riverrun
Lather Catcher
sɐǝɹpu∀
Posts: 888
|
Post by riverrun on Mar 24, 2019 6:45:20 GMT -6
I couldn't resist: 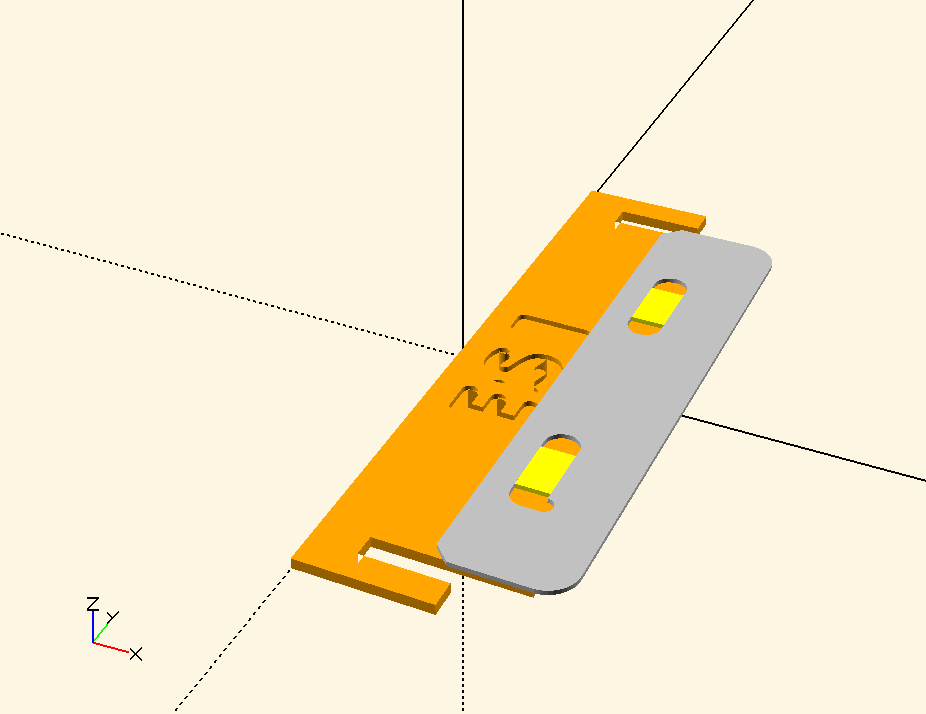 |
|
|
|
Post by jayaruh on Mar 24, 2019 9:09:51 GMT -6
You da man.
|
|
|
|
Post by jmudrick on Mar 24, 2019 11:42:42 GMT -6
I couldn't resist: This could be tricky as the injector blade goes on the bottom, at least that's how I've made it work. Not sure how the injector blade stays put as it's inserted upside down. |
|
riverrun
Lather Catcher
sɐǝɹpu∀
Posts: 888
|
Post by riverrun on Mar 24, 2019 12:24:03 GMT -6
This could be tricky as the injector blade goes on the bottom, at least that's how I've made it work. Not sure how the injector blade stays put as it's inserted upside down. This image suggests the Proline is above the Enders (Enders behind Proline) Here is what it looks like. The Enders blade is behind the injector blade. 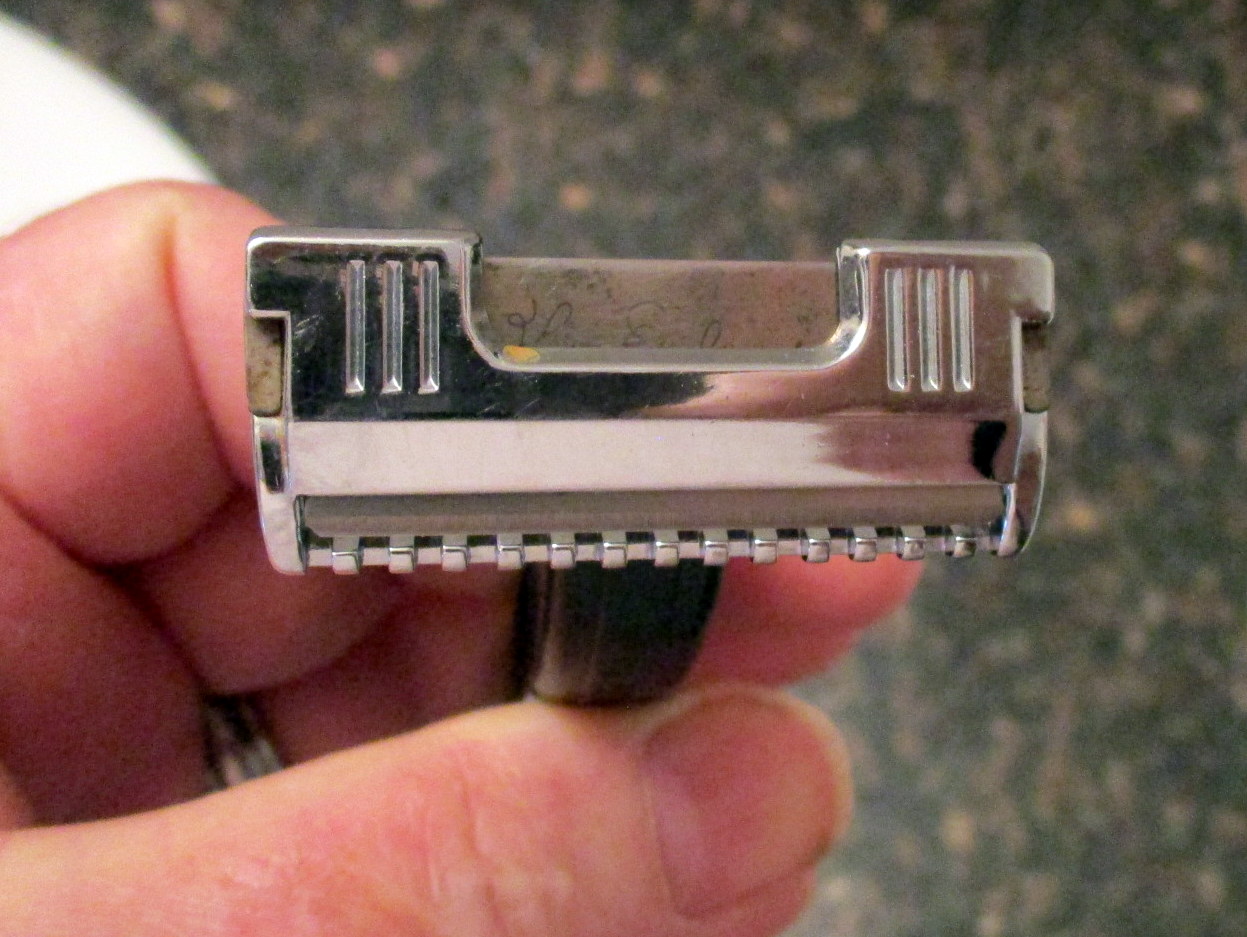 The side with the pegs and the Proline blade will point upwards towards the cap of the razor. The springiness of the tongues should push the adapter (and with it the Proline) against the top cap, holing everything securely. |
|
riverrun
Lather Catcher
sɐǝɹpu∀
Posts: 888
|
Post by riverrun on Mar 24, 2019 12:50:36 GMT -6
And one more:  |
|
|
|
Post by jayaruh on Mar 24, 2019 14:17:44 GMT -6
Excellente!
|
|
riverrun
Lather Catcher
sɐǝɹpu∀
Posts: 888
|
Post by riverrun on Mar 24, 2019 14:35:53 GMT -6
5 adapters ordered - $7 delivered. Now for the wait.
|
|
|
|
Post by jmudrick on Mar 24, 2019 14:51:49 GMT -6
This could be tricky as the injector blade goes on the bottom, at least that's how I've made it work. Not sure how the injector blade stays put as it's inserted upside down. This image suggests the Proline is above the Enders (Enders behind Proline) Here is what it looks like. The Enders blade is behind the injector blade. The side with the pegs and the Proline blade will point upwards towards the cap of the razor. The springiness of the tongues should push the adapter (and with it the Proline) against the top cap, holing everything securely. Yes above and below depends on perspective. The "blade tray" in the Enders is the top of the head so the injector goes on the tray , the shim/adapter on top of it. Rusty shim pictured makes this clear. Thus I'm still not clear on how the pegs engage with the injector blade but I'll leave it to he with the adapter to get that done.  |
|
riverrun
Lather Catcher
sɐǝɹpu∀
Posts: 888
|
Post by riverrun on Mar 24, 2019 15:15:23 GMT -6
This image suggests the Proline is above the Enders (Enders behind Proline) The side with the pegs and the Proline blade will point upwards towards the cap of the razor. The springiness of the tongues should push the adapter (and with it the Proline) against the top cap, holing everything securely. Yes above and below depends on perspective. The "blade tray" in the Enders is the top of the head so the injector goes on the tray , the shim/adapter on top of it. Rusty shim pictured makes this clear. Thus I'm still not clear on how the pegs engage with the injector blade but I'll leave it to he with the adapter to get that done. We're talking about the same thing. How it is supposed to work: You click the Proline blade onto the adapter (see animation) then you just slide both into the razor, just like an Enders blade, with the Proline facing the "blade tray". The "ES1" from the first animation would be (partly) visible through the opening where you are "grasping the blade at the rear where the top wall has been indented to provide a thumb-hold" (quote from the patent). So far the theory. I'll find out in a few days if my ideas actually work. P.S.: That shim sure is rusty.  |
|
|
|
Post by jmudrick on Mar 24, 2019 15:22:53 GMT -6
Yes above and below depends on perspective. The "blade tray" in the Enders is the top of the head so the injector goes on the tray , the shim/adapter on top of it. Rusty shim pictured makes this clear. Thus I'm still not clear on how the pegs engage with the injector blade but I'll leave it to he with the adapter to get that done. We're talking about the same thing. How it is supposed to work: You click the Proline blade onto the adapter (see animation) then you just slide both into the razor, just like an Enders blade, with the Proline facing the "blade tray". The "ES1" from the first animation would be (partly) visible through the opening where you are "grasping the blade at the rear where the top wall has been indented to provide a thumb-hold" (quote from the patent). So far the theory. I'll find out in a few days if my ideas actually work. P.S.: That shim sure is rusty. I'll await proof of concept with great interest. Yes it is. |
|


